Uptown HTML
Advanced CSS Techniques
CSS is the building block of todays web design. It displays some styling to your site and even down to the content in your site, but there are two levels of techniques to CSS, beginner and advanced. To become a good web designer you must master both.
Objective
In this lesson you will be learning how to use advanced CSS techniques to build a simple web page that looks appealing to your audience
Sub Objective
This lesson will include the following key points about Advanced CSS Techniques: :Before, :After, and content.
View Demo
Advanced CSS Techniques
We are going to create the finished peace using advanced CSS techniques. First we need to create the base of our site witch would be the HTML. We are going to be using the following tags in our HTML: <div>, <header>, <section>, <p>, <figure>, and <figcaption>.If you are not sure what some of these terms are then refer back to the lesson named HTML5 structural tags. Below is how we will be setting up our HTML document.

<div id="container">
<header>
	<h1>Advanced CSS Techniques</h1>
</header>
<section id="firstcol">
  <p>Cum sociis natoque penatibus et magnis dis parturient montes, nascetur ridiculus mus. Morbi felis ligula, molestie non mollis in, fermentum a erat. Phasellus eu egestas nibh, a condimentum magna. Donec suscipit risus urna, id consectetur massa ultrices ac. Pellentesque pellentesque vitae augue sed tempus. Phasellus blandit porta leo vitae pharetra. Phasellus viverra libero at purus sodales pulvinar. Donec a aliquet diam, vel condimentum diam. Aliquam vulputate arcu nec congue porttitor! Aenean nec imperdiet eros. Etiam bibendum rhoncus nibh, sit amet lobortis quam dignissim vel!</p>

  <p>Nulla non dolor turpis. Cum sociis natoque penatibus et magnis dis parturient montes, nascetur ridiculus mus. Vivamus pharetra turpis turpis, in laoreet sapien pulvinar eu? In aliquet dictum massa vel eleifend. Aenean accumsan fermentum sapien, in iaculis enim consectetur id? Sed gravida laoreet tempus. Mauris dignissim ullamcorper vestibulum. Nullam accumsan convallis enim a interdum? Aenean condimentum auctor felis, ac iaculis risus!</p>

  <p>Morbi eu felis at diam pulvinar congue. Sed semper mauris libero, ac pulvinar dui elementum eu. Morbi in orci sed neque vestibulum volutpat. Curabitur et accumsan ipsum, quis dictum enim. Ut vestibulum lorem nec condimentum luctus. Morbi quis lacus sit amet lorem luctus hendrerit. Proin scelerisque turpis felis, sit amet porta urna bibendum ut. Praesent accumsan, ligula et tincidunt bibendum, nisi mi congue purus; id porta urna ligula id sapien. Nunc nec mi vel lectus mollis pellentesque eget nec felis! In lorem mi; euismod non nulla sit amet, sollicitudin tincidunt lorem. Morbi et quam ac leo cursus ultricies sed id magna. Vivamus sed augue vel velit cursus placerat at convallis neque. Quisque ut ullamcorper ante. Curabitur sit amet dictum mauris, ut commodo mi.</p>
  <figure>
  <img src="file:///ThawSpace/gary_gibson/Desktop/AdvCSS/sunset.jpg" height="400" width="400" id="sunset" />
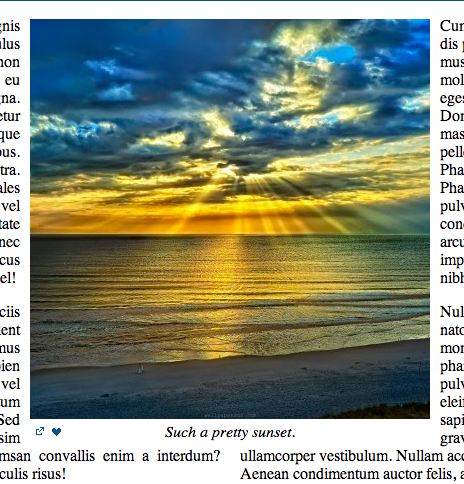
  <figcaption><a href="#" class="download">download</a><a href="#" class="love">Like Us</a>Such a pretty sunset.</figcaption>
  </figure>
</section>
<section id="secondcol">
  <p>Cum sociis natoque penatibus et magnis dis parturient montes, nascetur ridiculus mus. Morbi felis ligula, molestie non mollis in, fermentum a erat. Phasellus eu egestas nibh, a condimentum magna. Donec suscipit risus urna, id consectetur massa ultrices ac. Pellentesque pellentesque vitae augue sed tempus. Phasellus blandit porta leo vitae pharetra. Phasellus viverra libero at purus sodales pulvinar. Donec a aliquet diam, vel condimentum diam. Aliquam vulputate arcu nec congue porttitor! Aenean nec imperdiet eros. Etiam bibendum rhoncus nibh, sit amet lobortis quam dignissim vel!</p>

  <p>Nulla non dolor turpis. Cum sociis natoque penatibus et magnis dis parturient montes, nascetur ridiculus mus. Vivamus pharetra turpis turpis, in laoreet sapien pulvinar eu? In aliquet dictum massa vel eleifend. Aenean accumsan fermentum sapien, in iaculis enim consectetur id? Sed gravida laoreet tempus. Mauris dignissim ullamcorper vestibulum. Nullam accumsan convallis enim a interdum? Aenean condimentum auctor felis, ac iaculis risus!</p>
  <p>Morbi eu felis at diam pulvinar congue. Sed semper mauris libero, ac pulvinar dui elementum eu. Morbi in orci sed neque vestibulum volutpat. Curabitur et accumsan ipsum, quis dictum enim. Ut vestibulum lorem nec condimentum luctus. Morbi quis lacus sit amet lorem luctus hendrerit. Proin scelerisque turpis felis, sit amet porta urna bibendum ut. Praesent accumsan, ligula et tincidunt bibendum, nisi mi congue purus; id porta urna ligula id sapien. Nunc nec mi vel lectus mollis pellentesque eget nec felis! In lorem mi; euismod non nulla sit amet, sollicitudin tincidunt lorem. Morbi et quam ac leo cursus ultricies sed id magna. Vivamus sed augue vel velit cursus placerat at convallis neque. Quisque ut ullamcorper ante. Curabitur sit amet dictum mauris, ut commodo mi.</p>
</section>
</div>
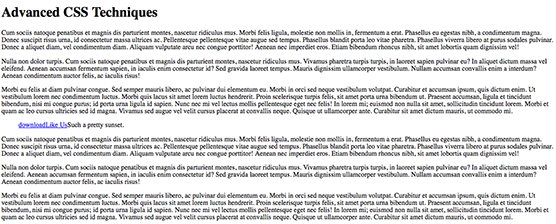
Once you have successfully put in your code for your HTML document your site should look similar to the screenshot below.

Centering Our Container
It is now time to work on our CSS since he have completed our HTML. The first thing we are going to do is center our information. In order for us to do this we need to give our div with the ID of container some CSS properties as you see below in the code box.

#container {
	overflow:hidden;
	width: 960px;
	margin: 0 auto;
}
Styling Our Header
Now that our information is centered, we are going to start working on our header first. The first thing we are going to do to our header is style the text.

h1 {
    color: #FFFFFF;
    font-size: 48px;
    line-height: 100px;
    text-align: center;
}
What we did here was make our title white, centered it, and gave it a font size of 48 pixels and gave it some line height so that our title would not be so close to the top.
Now its time to create the header it self, we will do this by attacking the <header> tag but to get the affect that we want will have to do a little more work then just attacking the header tag. First we are just going to give the header some basic styles.
header {
	background-color: #125389;
	height: 100px;
	position: relative;
}
The header now has the basic styles that we want but we still need to create that banner look to it. In order for us to create this unique look we need to do a little bit more work. We will need to use the Before and After properties. The :before selector basically puts in content before the HTML tag dose and the :After selector is the opposite of the :before selector.
/*this is where we make the white box that is placed in the header*/
header:before {
	content: ' ';  /* this atribute is what generates invisable content so that we can have a empty box */
	display: block;
	height: 70px;
	width: 70px;
	position: absolute;
	top: 15px;
	left: -35px;
	background-color: white;
	transform: rotate(45deg);
	-ms-transform: rotate(45deg); /* IE 9 */
	-webkit-transform: rotate(45deg); /* Safari and Chrome */
}
header:after {
	content: ' ';  /* this atribute is what generates invisable content so that we can have a empty box */
	display: block;
	height: 70px;
	width: 70px;
	position: absolute;
	top: 15px;
	right: -35px;
	background-color: white;
	transform: rotate(45deg);
	-ms-transform: rotate(45deg); /* IE 9 */
	-webkit-transform: rotate(45deg); /* Safari and Chrome */
	z-index: 10;
}
/*this is where we make the white box that is placed in the header*/
Using these styles allowed us to rotate our empty boxes to give the user a visual sight of a banner with out it being a image. This also help us as developers because it increases out web page load speed because there are less images that are needed to be downloaded to the users computer when they visit our sires.
Content Styling
We have finally finished creating our banner, now we can began to start styling our content. The first peace of our content that we are going to style is all of our section tags.

section {
	width: 470px;
	float: left;
	position: relative;
}
We floated all of our sections to the left so that they would be next to each other but now we need to control what is inside of section tags. We do this by targeting our section ID names. The styles below in the code box are the styles we will give those ID's.
#firstcol {
	margin-right: 20px;
	text-align:justify;/*this aligns the text straight*/
}
#secondcol:before {
	float: left;
}
The text content is now taking care of but now we need to create space in between our text to place an image here. We will do this by using the :Before selector again but this time we are going to put it on our section tag. We are also going to give it the following styles below.
section:before {
	content: '';
	display: block;
	width: 200px;
	height: 440px;
	float: right;
}
Placing The Image
Now that we have finally created some space for our image it is now time to use it. We are going to place a image there, to do this we are going to be giving our <figure> tag and our figcaption some CSS properties which are listed below.

figure {
	padding: 0;
	margin: 0;
	position: absolute;
	right: -210px;
	top: 18px;
	width: 400px;
}
figcaption {
	font-style: italic;
	text-align: center;
	position: relative;
}
These styles are positioning the image directly in the center of the text and style the text for the caption for the image that it represents.
Preview image

CSS Image Sprites
Every thing is nearly complete; we just need to throw on some bells and whistles. To do this we are about to put some icons on the bottom of the image. These icons will have hover affects and will be only one image. The code below will show you how this is done

.download {
	display: block;
	height: 18px;
	width: 18px;
	float: left;
	background: url('your image file path goes here') -30px -80px no-repeat transparent;
	position: absolute;
	left: 0;
	text-indent:-10000px;
}
.love {
	display: block;
	height: 18px;
	width: 18px;
	float: left;
	background: url('your image file path goes here') -208px -112px no-repeat transparent;
	position: absolute;
	left: 18px;
	text-indent:-10000px;
}
.love:hover {
	background: url('your image file path goes here') -223px -112px no-repeat transparent;
}
Lesson Plan
Now that you have seen how to use these advanced CSS techniques, it is time to put them to use. Take the sample code below and try to implement it using the CSS techniques you have learned through out his lesson.

<body>
<div id="container">
<header>
	<h1>Advanced CSS Techniques</h1>
</header>
<section id="firstcol">
  <p>Cum sociis natoque penatibus et magnis dis parturient montes, nascetur ridiculus mus. Morbi felis ligula, molestie non mollis in, fermentum a erat. Phasellus eu egestas nibh, a condimentum magna. Donec suscipit risus urna, id consectetur massa ultrices ac. Pellentesque pellentesque vitae augue sed tempus. Phasellus blandit porta leo vitae pharetra. Phasellus viverra libero at purus sodales pulvinar. Donec a aliquet diam, vel condimentum diam. Aliquam vulputate arcu nec congue porttitor! Aenean nec imperdiet eros. Etiam bibendum rhoncus nibh, sit amet lobortis quam dignissim vel!</p>

  <p>Nulla non dolor turpis. Cum sociis natoque penatibus et magnis dis parturient montes, nascetur ridiculus mus. Vivamus pharetra turpis turpis, in laoreet sapien pulvinar eu? In aliquet dictum massa vel eleifend. Aenean accumsan fermentum sapien, in iaculis enim consectetur id? Sed gravida laoreet tempus. Mauris dignissim ullamcorper vestibulum. Nullam accumsan convallis enim a interdum? Aenean condimentum auctor felis, ac iaculis risus!</p>

  <p>Morbi eu felis at diam pulvinar congue. Sed semper mauris libero, ac pulvinar dui elementum eu. Morbi in orci sed neque vestibulum volutpat. Curabitur et accumsan ipsum, quis dictum enim. Ut vestibulum lorem nec condimentum luctus. Morbi quis lacus sit amet lorem luctus hendrerit. Proin scelerisque turpis felis, sit amet porta urna bibendum ut. Praesent accumsan, ligula et tincidunt bibendum, nisi mi congue purus; id porta urna ligula id sapien. Nunc nec mi vel lectus mollis pellentesque eget nec felis! In lorem mi; euismod non nulla sit amet, sollicitudin tincidunt lorem. Morbi et quam ac leo cursus ultricies sed id magna. Vivamus sed augue vel velit cursus placerat at convallis neque. Quisque ut ullamcorper ante. Curabitur sit amet dictum mauris, ut commodo mi.</p>
  <figure>
  <img src="file:///ThawSpace/gary_gibson/Desktop/AdvCSS/sunset.jpg" height="400" width="400" id="sunset" />
  <figcaption><a href="#" class="download">download</a><a href="#" class="love">Like Us</a>Such a pretty sunset.</figcaption>
  </figure>
</section>


<section id="secondcol">
  <p>Cum sociis natoque penatibus et magnis dis parturient montes, nascetur ridiculus mus. Morbi felis ligula, molestie non mollis in, fermentum a erat. Phasellus eu egestas nibh, a condimentum magna. Donec suscipit risus urna, id consectetur massa ultrices ac. Pellentesque pellentesque vitae augue sed tempus. Phasellus blandit porta leo vitae pharetra. Phasellus viverra libero at purus sodales pulvinar. Donec a aliquet diam, vel condimentum diam. Aliquam vulputate arcu nec congue porttitor! Aenean nec imperdiet eros. Etiam bibendum rhoncus nibh, sit amet lobortis quam dignissim vel!</p>

  <p>Nulla non dolor turpis. Cum sociis natoque penatibus et magnis dis parturient montes, nascetur ridiculus mus. Vivamus pharetra turpis turpis, in laoreet sapien pulvinar eu? In aliquet dictum massa vel eleifend. Aenean accumsan fermentum sapien, in iaculis enim consectetur id? Sed gravida laoreet tempus. Mauris dignissim ullamcorper vestibulum. Nullam accumsan convallis enim a interdum? Aenean condimentum auctor felis, ac iaculis risus!</p>

  <p>Morbi eu felis at diam pulvinar congue. Sed semper mauris libero, ac pulvinar dui elementum eu. Morbi in orci sed neque vestibulum volutpat. Curabitur et accumsan ipsum, quis dictum enim. Ut vestibulum lorem nec condimentum luctus. Morbi quis lacus sit amet lorem luctus hendrerit. Proin scelerisque turpis felis, sit amet porta urna bibendum ut. Praesent accumsan, ligula et tincidunt bibendum, nisi mi congue purus; id porta urna ligula id sapien. Nunc nec mi vel lectus mollis pellentesque eget nec felis! In lorem mi; euismod non nulla sit amet, sollicitudin tincidunt lorem. Morbi et quam ac leo cursus ultricies sed id magna. Vivamus sed augue vel velit cursus placerat at convallis neque. Quisque ut ullamcorper ante. Curabitur sit amet dictum mauris, ut commodo mi.</p>
</section>
</div>
</body>
jogging your memory
Remember in the previous lessons we learned about HTML5 structural tags. These tags are what we have used in our example but if you don’t remember what they are and what they mean then these terms are listed below.

artical: Defines self-contained content that could exist independently of the rest of the content.

aside: Defines content aside from the page content

section: Defines a section in a document.

nav: Defines a section that contains only navigation links.

header: Defines the header of a page or section. It often contains a logo, the title of the Web site, and a navigational table of content.

figure: Represents a figure illustrated as part of the document.

figurecaption: Represents the legend of a figure.
If you would like to refresh your mind with some basic CSS styles then just click the link below.
Related Sources
If you would like to see more uses of Advanced CSS Techniques, just visit to sites below.
Tools:
Using :Before and :After Selectors
53 CSS-Techniques You Couldn’t Live Without
The Finished Peace
Now that you understand how to successfully use Advanced CSS Techniques, try and test your self on what you have learned by taking the quiz located on the right side of the screen. GOOD LUCK!!!
Click the link below to see the finished peace using Advanced CSS Techniques.
